Llama crafts and DIY projects: printable bookmark and cardboard models
Step-by-step workshop to build a cardstock llama bookmark with a downloadable A4 template, 3D slotted cardboard models and classroom learning activities.
TodoLlamas · Editorial approach
Published · Content rewritten
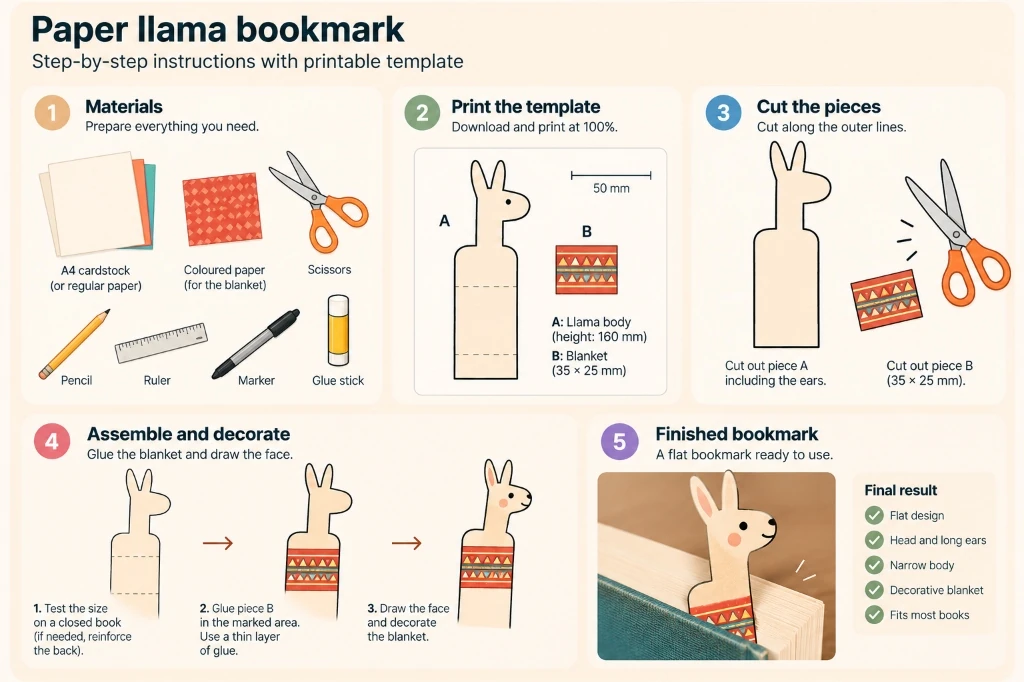
Working with paper and cardstock translates the distinctive anatomy of the llama (Lama glama) into clear geometric shapes suited for both home crafting and classroom workshops. This tutorial starts with a precision flat project—a cardstock llama bookmark featuring an Andean blanket and drawn facial details—and expands into three-dimensional slotted cardboard models and articulated puppets designed to explore South American camelid morphology, plane symmetry and Andean textile geometry. [1, 2] Because the original A4 template provides pre-calibrated outlines and placement marks, anyone can complete the base model without freehand drawing skills or bulky store-bought embellishments.
Materials, paper weights and printer calibration
Selecting the right paper weight determines the mechanical durability of the finished craft, especially along the slender llama neck, which acts as a lever arm where the bookmark extends above a book's pages. Before cutting, gather the materials listed in the technical table below and verify your printer's scaling output.
| Component or tool | Recommended specification | Technical role in the project |
|---|---|---|
| Base cardstock (piece A) | 180 to 250 g/m² weight, A4 size (210 × 297 mm), long grain parallel to height. | Provides longitudinal stiffness to the neck and ears without wedging the book spine open. |
| Contrast paper (piece B) | 80 to 120 g/m² dyed paper in terracotta, ochre, indigo or crimson tones. | Forms the decorative saddle blanket while keeping the profile ultra-thin. |
| Recycled cardboard (3D model) | 1.5 to 2.5 mm solid chipboard or micro-flute cardboard (cereal or mailer boxes). | Allows construction of the freestanding 90-degree slotted interlocking model. |
| Solid adhesive | Solvent-free glue stick or sparingly brushed PVA school glue. | Bonds paper layers flat without moisture-induced warping or wrinkling. |
| Cutting and drawing tools | Blunt-tip scissors, 30 cm millimetre ruler, HB pencil and fine black marker. | Ensure clean outer cuts, accurate 50 mm scale verification and crisp facial details. |
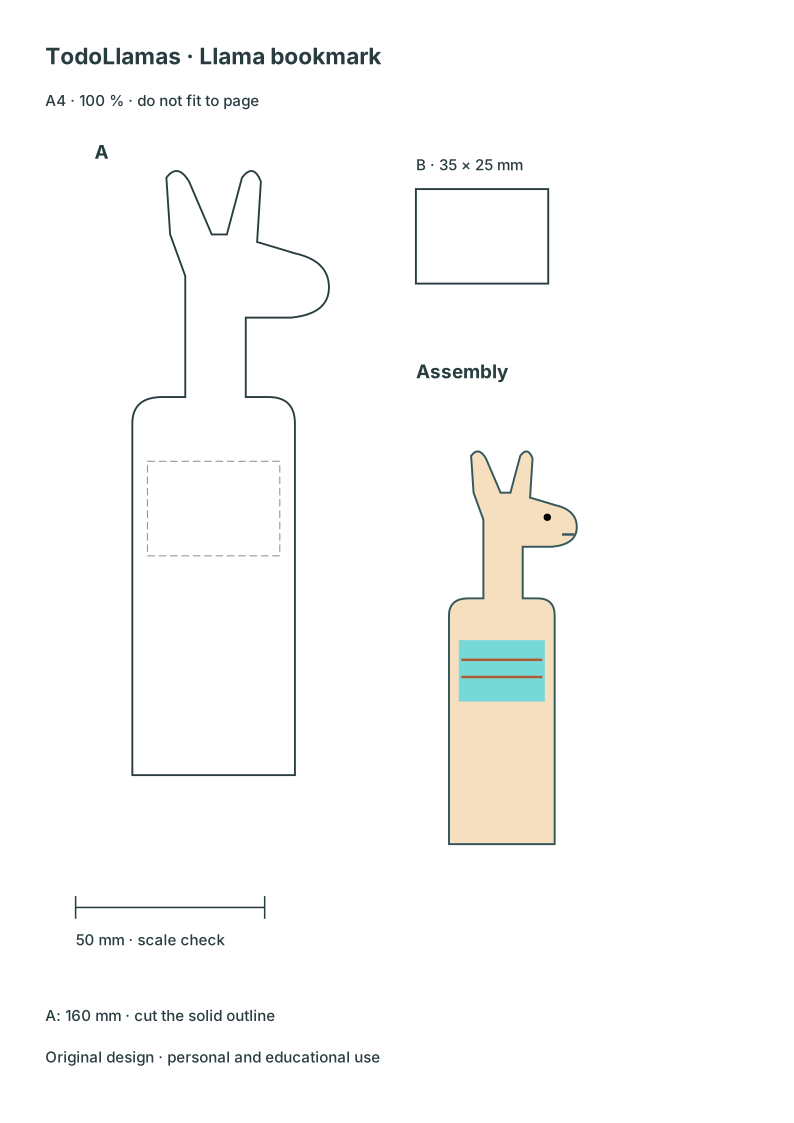
Download the original A4 SVG template. Open the vector file in your browser and print on A4 paper or cardstock at 100% scale, making sure “fit to page” or “shrink to printable area” is turned off. Before cutting, measure the printed check bar with a millimetre ruler: it must measure exactly 50 mm. When printed at true scale, the main llama silhouette stands 160 mm tall.
Five-step cardstock bookmark assembly
- Prepare and cut the main silhouette (piece A). Print the template directly onto light-coloured cardstock, or print on standard copy paper and transfer the outline onto cardstock by rubbing soft pencil graphite on the reverse side. Cut carefully just outside the solid perimeter line, keeping the curved tips of both ears intact and preserving a smooth transition from neck to back. Do not cut the interior facial lines or blanket alignment marks.
- Perform a structural book test. Slip the straight body of piece A gently between the pages of a closed book so that the neck and head project above the top edge. If your cardstock feels overly flexible and the neck bends easily, laminate a second identical cardstock cutout onto the back before adding surface details.
- Measure and cut the Andean blanket (piece B). Piece B is a 35 × 25 mm rectangle representing the traditional woven llijlla or pack blanket used by Andean herders to protect a working llama's back. [1] Cut the rectangle from the template or measure a 35 × 25 mm piece directly onto coloured paper using a ruler and set square.
- Laminate flat without raised embellishments. Apply a thin, even coat of glue stick across the back of blanket B, align it between the registration marks on piece A and press firmly from the centre outward through a clean scrap sheet. Avoid gluing buttons, beads, plastic googly eyes or yarn pom-poms: a bookmark must stay completely flat so it never dents pages or strains a book's binding.
- Draw anatomical and textile details. Guided by the assembly diagram on the template, use a fine marker to draw the large eye with straight eyelashes, the elongated nostril and the characteristic split upper lip (philtrum) of camelids. [2] Decorate blanket B with stepped frets, parallel stripes or diamond motifs inspired by highland weaving, let the adhesive dry completely and erase any remaining pencil marks.
Three-dimensional variations: slotted cardboard standee and jointed puppet
Once you have completed the flat bookmark, the same silhouette can be adapted into three hands-on structural variations for home or classroom exploration:
- Freestanding 90-degree slotted cardboard model: Trace the torso-and-neck profile (omitting the legs) onto 2 mm cardboard, and draw two separate inverted-U pieces for the front and rear leg pairs. Cut a 15 mm deep vertical slot into the bottom edge of the torso at the shoulder and hip positions, and matching vertical slots into the top centre of each leg piece. Make the width of every slot match the exact thickness of your cardboard (for example, 2 mm). Sliding the leg pieces perpendicularly into the torso slots creates a sturdy three-dimensional llama that stands upright without glue.
- Articulated biomechanical paper puppet: Cut the torso, neck-and-head unit, ears and four legs as separate pieces from heavy 250 g/m² cardstock. Punch small holes at the anatomical pivot joints (base of the neck, ear bases, shoulder and hip) and join the segments with small brass paper fasteners (split pins). Students can move the limbs to demonstrate how camelids swing both legs on the same side forward together in a pacing gait, and tilt the ears and tail to model social signalling.
- Double-coat fleece texture collage: Enlarge the silhouette onto poster board to illustrate the two-layered structure of a llama's coat, which combines a fine insulating undercoat with longer coarse guard hairs over the body while keeping short, smooth hair on the face and lower legs. [1, 2] Represent the torso coat with carded wool roving or cotton fibres and shade the face and lower limbs with short pencil strokes.
Classroom applications: geometry and comparative zoology
In primary and lower-secondary education, this craft workshop bridges visual art, geometry and natural science. Cutting the 35 × 25 mm blanket provides a concrete exercise in calculating perimeter (120 mm) and surface area (875 mm²), exploring axial symmetry and translation patterns in Andean geometric borders, and verifying metric ratios using the 50 mm calibration bar.
For a zoology extension, compare the template's proportions with our identification guide to llamas, alpacas, vicuñas and guanacos. Challenge students to modify a second copy of piece A so that it represents an alpaca instead of a llama: they will need to shorten the ears and straighten their tips, reduce the neck length and add a rounded woolly topknot over the forehead. Learners who want to construct the animal's outline freehand before cutting can follow our six-step grid drawing tutorial.
Troubleshooting and adjustment guide
| Observed issue | Technical cause | Recommended fix |
|---|---|---|
| Neck bends when placed in a book | Cardstock weight is too light or paper grain runs horizontally across the neck. | Glue a reinforcing cardstock backing cut with the paper grain running vertically. |
| Paper curls or ripples after gluing | Excess moisture from heavy application of liquid water-based glue. | Use a glue stick sparingly and press the finished bookmark under a heavy book for 15 minutes. |
| Printed template is shorter than 160 mm | Printer dialog applied automatic page margins or “fit to page” scaling. | Select “Actual size” or “100% scale” in print settings and confirm the check bar measures 50 mm. |
| 3D cardboard leg joints wobble | Interlocking slots were cut wider than the actual thickness of the cardboard sheet. | Measure cardboard thickness before cutting slots, or glue a thin cardstock shim inside loose slots. |
Frequently asked questions about llama crafts
- What if my home printer cannot feed thick cardstock? Print the SVG template onto ordinary 80 g/m² copy paper, clip the sheet over your cardstock and trace the perimeter firmly with a dry ballpoint pen to indent the card, or trace it against a sunlit window before cutting.
- What age group is this craft best suited for? The flat cardstock bookmark works well for children aged 6 and up using blunt-tip school scissors with adult assistance around the curved ears; the 3D slotted cardboard model and metric scaling exercises are ideal for ages 8 to 14.
- Can schools and libraries photocopy and distribute these templates? Yes. All templates and diagrams in this workshop are original TodoLlamas designs available to print and distribute freely for personal, classroom, library and non-commercial educational use.